This article describes how to push individual products or migrate your entire catalog from Clover to your eCommerce or vice versa!
Overview
What is pushing products? What's a catalog migration? Here are some quick definitions to get you started with this jargon we use here at SKU IQ.
📒 Pushing - The act of sending an item from one platform to the other. This includes all of the information for that item - so the title, price, variants, and more. This allows you to avoid entering the information again on the other platform. You can enter this information either on Clover or Shopify first. Note that if you enter the item into Clover first as a new item, any pictures or description that you add will not translate to Shopify.
📒 Catalog Migration - This is the act of sending your entire catalog of items over from one platform to the other. This is a great idea if you are just starting your Shopify store. Like mentioned above, you will need to add pictures and descriptions to these items on Shopify!
So, how do you send your items over to the opposing platform?
How to Push Your Inventory
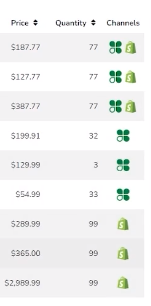
If you have inventory on both sides (e.g. Clover & Shopify) that you can possibly match, check out the article on Linking existing products first. On the Products page of your dashboard, you'll see all of your inventory. You can use the Filter button on the right hand side to sort your inventory a bit more and see only items that exist on Clover or only items that exist on Shopify. It's important to NOT push items that already have a match (link). Those will be items that exist both in-store and online. You'll see both the Clover & Shopify icons next to these items versus one or the other (see image to the right). If you push an item that already exists on that platform to that platform, it may cause duplication. Please be careful!
How to Push Items:
1. From the products page, click the name of the item that you would like to send over to the opposing platform.
You may need to use the filters or search functionality to narrow down what you'd like to send over.

📒 Note: For items that you'd like to sell online, make sure that "Show Online" is enabled for those products on Clover before you push them to Shopify! You will also want to make sure that you have added an Online Name for the product on Clover - this will be what is reflected on Shopify!

2. You will see a couple of toggles on the right

hand side of the product's detail page under Channels. This is where you control where the product "lives" so to speak. Having both toggles on will have the product exist on both Clover and Shopify. Having the toggle on for one platform or the other indicate that the product exists on only that platform. You can also see where items are by checking the Channels column on the Products page itself.
Having both the Clover & Shopify icons in the Channels section indicate that the product exists on both platforms and has a Syncing Relationship (meaning that any changes to inventory or various product attributes will sync between the two).
In order to push the item over to the other platform, all you have to do is click the toggle for the channel that the product doesn't exist on. It will take 1 to 1.5 minutes for the item to show up on the new platform.
3. You can then add any pictures, descriptions, or other information you may want on your eCommerce platform or your Point of Sale. Make sure to keep in mind what product attributes are set to automatically sync changes between the platforms after you have formed that syncing relationship (e.g. price, quantity, online name, etc.)!
If you are pushing your products from Clover to Shopify, you may need to go into your Shopify dashboard and set the product from draft to active.
